Threaded Hole Guideline
Last updated on Jun 14, 2025
Currently, there are numerous issues related to threaded components in actual production. Some stem from design flaws, while others involve standard specification issues. To better summarize and explain these problems, the following issues with threads have been compiled.
Thread machining is a crucial application in CNC machining centers, and the quality and efficiency of thread processing directly impact the quality of component machining and the production efficiency of machining centers.
Threads refer to continuous raised portions with a specific cross-section, forming a helical line on the surface of cylindrical or conical bodies. Threads can be classified into external threads and internal threads based on their location on the body. According to their cross-sectional shape (tooth profile), threads can be rectangular, triangular, trapezoidal, sawtooth, or other special shapes. Commonly used threads include triangular and trapezoidal threads. When addressing thread-related issues, it is essential to consider these different thread types and choose and apply them based on actual requirements.
1. Bottom Hole and Thread
The bottom hole refers to the diameter of the hole reserved before tapping the internal thread with a tap. Generally, it refers to the internal circular hole in the workpiece, the lowest or topmost circular hole, known as the bottom hole. So why is there a need for tolerance fit between the thread and the bottom hole during production?
1-1. Prevention of Rework or Tool Damage due to Undersized or Matching Bottom Hole:
For example, when the thread is specified as M3*0.5 on a 2D drawing and the bottom hole diameter is ≤2.3, the bottom hole being too small prevents tapping with the tap, necessitating rework of the bottom hole. If the bottom hole diameter is ≥2.8, and it is close to or identical to the inner thread diameter, tapping can cause the tap to get stuck, leading to potential tap breakage.
1-2. Prevention of Thread Stripping due to Oversized Bottom Hole:
For instance, when the thread is specified as M3*0.5 on a 2D drawing and the bottom hole diameter is 2.8, the effective thread depth on one side is only 0.1mm. This small thread contact area can lead to thread stripping. While some thread inserts can remedy this, it is generally not recommended.
Explanation:
*Thread Stripping: In threaded connections, this occurs when the threads at the connection point wear out due to excessive force or other reasons, rendering the threads unable to engage. In such a situation, the threaded connection cannot be tightened.
2 Thread Reference Table
3. Thread Inserts
As mentioned earlier, if the bottom hole is oversized, one way to remedy the situation is by using thread inserts. But what exactly are thread inserts? In CNC mechanical machining, thread inserts refer to threaded bushings, as illustrated below. They can be added to the thread after tapping. What benefits does using thread inserts offer? Are there any negative impacts on the components?
Thread inserts serve to enhance connection strength, wear resistance, corrosion resistance, prevent loosening, and provide shock resistance, thereby extending the thread's lifespan. Threads, being assembly points, undergo frequent rotational movements, and over time, this can lead to damage, resulting in thread stripping or the inability to tighten the thread. Experienced designers often anticipate this scenario during the design phase and indicate on drawings which threads require inserts. The goal is to prolong the thread's usability, consequently extending the overall product lifecycle.
For example, when a thread is specified as M3*0.5 on a 2D drawing, and the bottom hole diameter is 3.0, this can be addressed by using an M3 thread insert.
4. Thread Insert Dimension Table
5. Effective Thread Depth
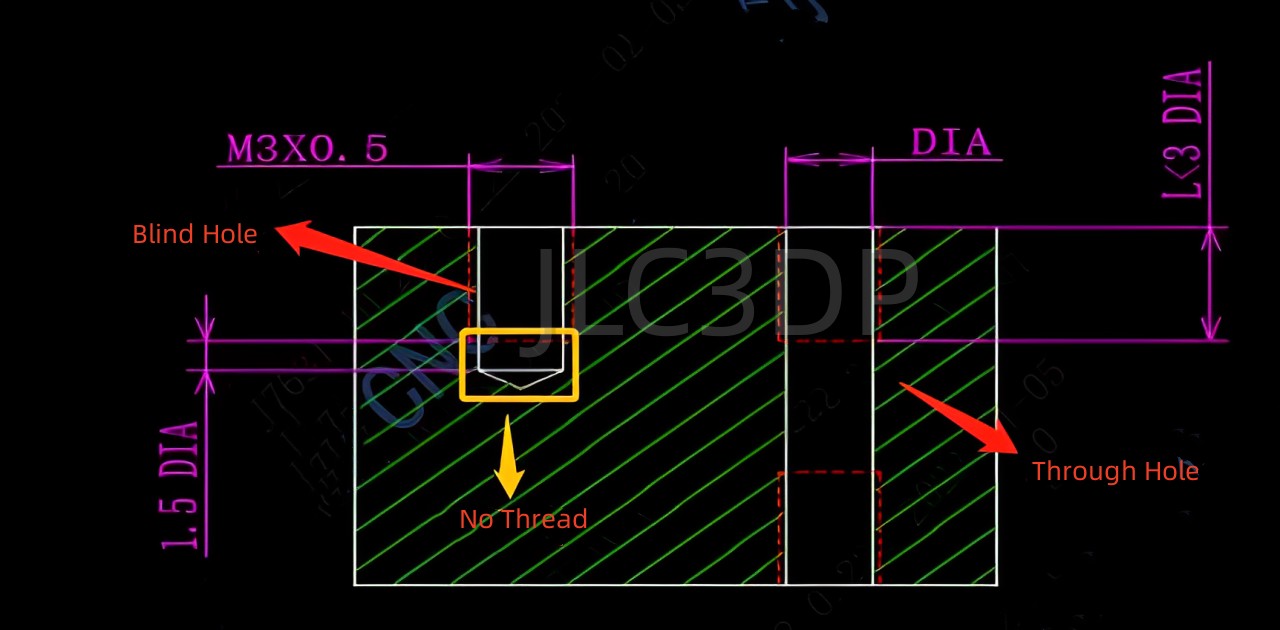
Thread depth generally refers to the effective length of a thread. In normal circumstances, the depth of the bottom hole for threading should be greater than the effective length of the thread. When machining the bottom hole, the drill bit has a pointed tip, while the tapping tap has a flat head. As the flat-headed tap cannot make complete contact with the very bottom of the bottom hole, it is recommended to leave at least half the diameter of the hole as non-threaded length when designing blind holes. For longer threaded holes, special tools may be required, leading to increased processing time and costs. Therefore, it is advisable for the effective thread length not to exceed three times the diameter of the hole.

6. Thread Annotation Standards in 2D Drawings
Interpretation:
- Feature Code: Represents the type of thread, for example, M indicates a standard thread.
- Size Code: Represents nominal diameter * pitch, for example, 3*0.5 (3 is the nominal diameter, 0.5 is the pitch).
- Tolerance Zone Code:Comprises tolerance grade code (numeric) and basic deviation code (lowercase for external threads, uppercase for internal threads), for example, 6H.
- Effective Length Code:Indicated by the code L (long), N (medium), S (short) to represent effective thread length. If the thread has a medium effective length, N is not specified.
- Direction Code: Not specified for right-handed threads; LH is specified for left-handed threads.
If the above annotations seem too intricate, a simplified approach can be adopted, as illustrated in the diagram below.
Interpretation:
:8 bottom holes with a diameter of 4.2, threaded with M5, effective thread depth of 10, and internal thread tolerance of 6H.
:A through-hole with a diameter of 14 traversing the component.
: Indicates depth.
7. Thread Hole Position
Thread holes should be positioned within the interior of the component. If thread holes are too close to the edge of the component, during machining, the thread may penetrate the part, leading to edge breakage and compromising the integrity of the component.