How to Remove Anodizing from Aluminum Parts
19 min
- Why Would You Need to Remove Anodizing?
- How to Remove Anodizing from Aluminum
- What Happens When Anodizing Is Removed?
- How to Choose an Anodizing Removal Method
- How to Produce Partially Anodized Aluminum Parts
- How Should Localized Anodizing Requirements Be Shown on a 2D Drawing?
- Anodizing Removal FAQs
- Conclusion About Anodizing Removal
Key Takeaways
- Chemical stripping is commonly used when anodizing needs to be removed from most or all of an aluminum part, but the process can also attack the underlying aluminum if it is not controlled.
- Mechanical removal works well for accessible areas but can change the surface texture and remove more base metal than intended.
- CNC machining gives better control when a defined anodized area needs to be removed from a precision part.
- Laser-based removal can be useful for controlled localized treatment, but process parameters have to be matched to the anodic layer and aluminum substrate.
- Removing anodizing does not automatically restore the part to its original surface condition or dimensions.
- If only certain areas need to remain uncoated, the drawing should clearly show the anodized regions, bare regions, boundaries, finish type, and any functional requirements.
- For production CNC parts, localized anodizing is usually easier to control when the requirement is defined before finishing rather than left for the supplier to interpret.
Anodizing is used on CNC-machined aluminum primarily to improve corrosion resistance and surface appearance. Thicker hardcoat anodizing can also increase surface wear resistance. The process forms a controlled aluminum oxide layer from the surface of the aluminum itself rather than simply adding a separate film.
The need to remove anodizing usually comes from a change in function, geometry, or finishing requirements. A grounding or contact area may need bare aluminum, a threaded or mating feature may require post-finish access, or a prototype may need rework before another machining or finishing operation.
For a precision part, anodizing removal should be defined by the required bare area, allowable substrate loss, and post-removal dimensional and surface requirements before the removal process is selected.
Why Would You Need to Remove Anodizing?
There are two very different anodizing removal jobs: full-surface removal and localized removal.
Full stripping, sometimes referred to as de-anodizing, is used when most or all accessible surfaces need to be exposed for rework or prepared for a different finish. Localized removal is more common when most of the anodized finish is useful, but certain areas need to remain electrically conductive, dimensionally accessible, machinable, or visually different.
Full-Surface Removal
Full-surface removal means stripping the anodic layer from most or all accessible surfaces of the aluminum part.
This may be needed when a part needs to be reworked, refinished, repaired, or prepared for another surface treatment. It can also be considered when an anodized part was produced with the wrong finish or when a design change makes the existing coating unsuitable.
Chemical stripping is commonly considered for full-surface removal because it can treat large surface areas at once. However, the stripping chemistry must be controlled to limit attack on the underlying aluminum and to achieve the required post-strip surface condition.
The stripping chemistry must be matched to the aluminum alloy, anodic coating, and required post-strip surface condition. Different alloys can respond differently to alkaline treatment, so the same stripping cycle does not necessarily produce the same surface condition on every aluminum part.
For precision components, that difference matters.
Localized Removal
Localized removal means removing anodizing from only a defined area while leaving the rest of the part anodized.
Typical examples include:
- Electrical contact or grounding areas
- Threaded or mating regions
- Masked assembly interfaces
- Areas that need to be machined after anodizing
- Surfaces that need direct aluminum-to-aluminum contact
This is where mechanical removal, secondary CNC machining, or laser-based processing becomes more useful.
A localized requirement should not be left to a verbal instruction such as "remove anodizing here." The location and boundary should be defined on the engineering drawing.
How to Remove Anodizing from Aluminum
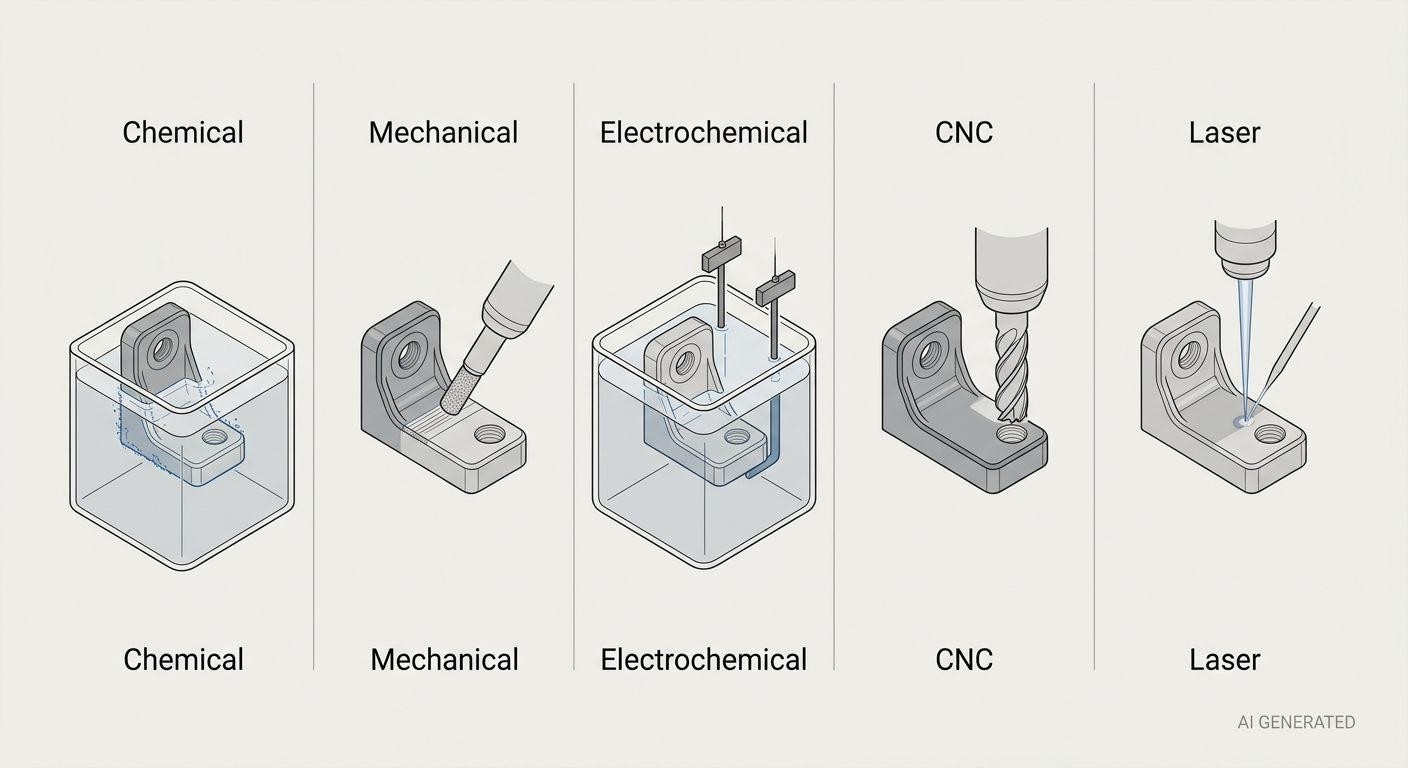
Methods for removing anodizing from an aluminum part
There is no single anodizing removal process that fits every aluminum part.
Chemical stripping, mechanical removal, secondary CNC machining, and laser-based removal approach anodizing removal differently. The appropriate method depends on the anodic coating, aluminum alloy, removal area, dimensional tolerance, surface-finish requirement, and production quantity.
Chemical Stripping
Chemical stripping uses a formulated solution to dissolve the anodic layer, but the chemistry may also react with the underlying aluminum once the anodic layer has been removed.
Alkaline chemistry is commonly used for aluminum surface treatment, including sodium hydroxide-based processes. However, aluminum itself also reacts with strong alkaline solutions. That is why uncontrolled stripping can etch the substrate, alter dimensions, or leave an uneven surface.
Chemical stripping can involve strongly alkaline or acidic chemicals, so production work should follow the finisher's process specification and SDS rather than a fixed household-cleaner recipe.
The Aluminum Anodizers Council notes that sodium hydroxide is also used as an aluminum etchant during surface preparation, where it removes metal and produces a matte surface.
That is an important distinction when stripping a finished CNC part. The objective is not simply to make the anodized color disappear. You also need to protect the underlying geometry.
Chemical stripping is generally better suited to broad or full-surface removal than highly precise small areas. Complex geometries can also make uniform treatment difficult because different surfaces may react differently depending on accessibility and process conditions.
For production work, the stripping chemistry, exposure time, temperature, alloy, and required post-treatment should be established by the finishing specialist rather than improvised on a precision part.
Hardcoat anodizing requires additional attention because the anodic layer is substantially thicker than a typical decorative anodize. A stripping cycle developed for a thin Type II film should not be assumed to produce the same result on a Type III hardcoat.
Mechanical Removal
Mechanical removal uses physical abrasion or cutting to remove the anodized layer.
Depending on the part, mechanical removal may involve sanding, abrasive finishing, blasting, grinding, or machining. These methods differ significantly in how well they control the removal boundary and the resulting surface texture.
Mechanical removal is useful when the target area is accessible and chemical immersion is undesirable, but the removal process directly changes the surface texture and may remove base aluminum along with the anodic layer.
Abrasive removal can leave a different texture from the surrounding anodized surface. Aggressive removal can also expose more base aluminum than intended. On a cosmetic component, the transition between the stripped area and the remaining anodizing may become visible.
Mechanical removal is therefore more suitable when the surface finish can tolerate some variation or when the area is accessible and relatively easy to control.
Secondary CNC Machining for Localized Removal
For a CNC-machined aluminum part with a defined area that must become bare, a secondary machining operation can provide repeatable control of the exposed boundary and finished geometry when sufficient stock remains and the part can be located from stable drawing datums.
The finishing pass cuts through the anodic layer, so the programmed depth and final feature dimension determine how much base aluminum is removed.
That makes the process especially useful when the exposed area has a functional purpose. A contact face, bore, pocket, thread, or mating surface can be machined to its specified post-removal dimension instead of being manually abraded until the coating appears to be gone.
The tradeoff is that machining removes base material too. If the area has a tight dimensional requirement, the drawing needs to account for the finished geometry.
For tight features, the second operation should be referenced from stable datums rather than from the anodized edge itself, and the fixture should protect the remaining cosmetic anodized surfaces from clamping marks or incidental contact.
For a broader look at how finishing can affect CNC part dimensions, see our guide to CNC surface finishes.
Laser Removal
Laser-based anodizing removal is a specialized finishing operation and should not be conflated with laser marking, which uses a different process objective and parameter set.
The process has to be carefully controlled because the laser interacts with both the anodic coating and the aluminum substrate. Excessive energy can cause substrate damage, discoloration, roughness, or localized thermal effects.
Laser removal is highly parameter-dependent. Energy density, pulse characteristics, scan conditions, and the anodic coating itself affect whether the process stops at the coating/substrate interface or begins to modify the aluminum surface.
Laser oxide removal can be useful for localized anodic-layer removal without tool contact, but the process must be validated for the specific coating and aluminum substrate to avoid modifying the base surface.
The required result still needs to be defined. Is the goal electrical contact, visual marking, bare aluminum exposure, or dimensional restoration? Those are different requirements.
If your aluminum part needs anodizing on the main surfaces but bare aluminum around a contact area, mating face, thread, or other functional feature, define the requirement with the CAD model and 2D drawing.

Need Partially Anodized Aluminum Parts?
JLCCNC can review the machining and finishing requirements together so the anodizing and localized removal are planned as part of the manufacturing process. Upload your CAD file to JLCCNC to request a CNC machining quote.
What Happens When Anodizing Is Removed?
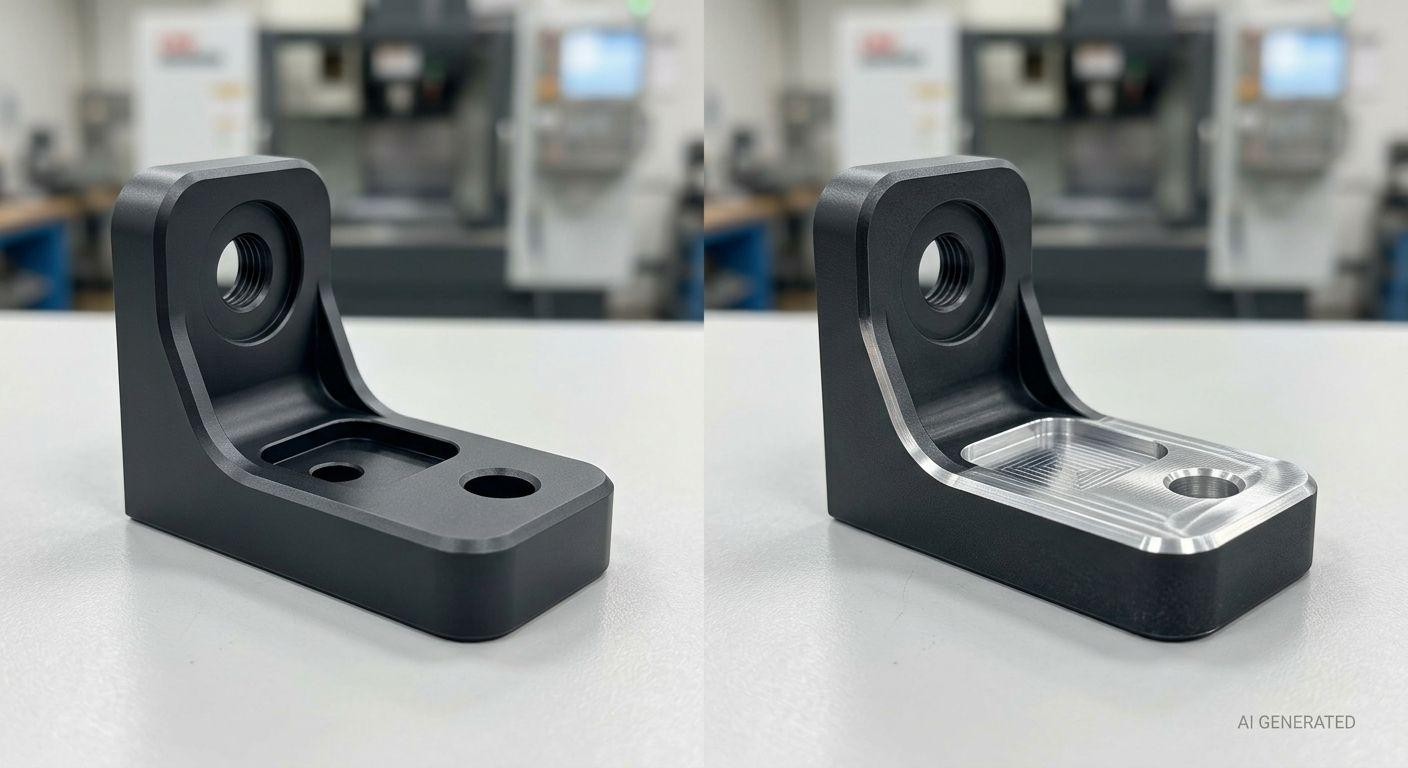
Aluminum part before and after anodizing is removed
Removing anodizing changes more than the color of the aluminum.
The most important effects are dimensional condition, surface finish, corrosion resistance, and electrical conductivity.
Dimensional Changes and Tolerance Loss
Anodizing has a measurable thickness.
The exact dimensional effect depends on the anodizing type and coating thickness. For JLCCNC parts, typical anodizing thickness depends on the finish. Standard anodizing is around 8 μm for natural finish and around 15 μm for other colors, while hardcoat anodizing is typically around 25–30 μm. These are typical values rather than universal specification limits, so critical dimensions should be evaluated against the actual finish requirement. JLCCNC's conductive anodizing is much thinner, at around 3 μm, and is intended for applications where controlled electrical conductivity is required.
Removing that layer does not automatically put every feature back at its original machining dimension.
If the part was originally machined with anodizing allowance, removing the anodic layer may move a feature back toward its pre-anodize condition. However, chemical stripping can also etch the aluminum substrate, while mechanical or CNC removal intentionally changes the geometry. The post-removal dimension therefore has to be verified rather than inferred from the coating thickness alone.
That is why precision parts should be evaluated based on the actual finished dimension rather than assuming the coating thickness can simply be added or subtracted.
Bearing bores, threaded holes, shafts, sealing faces, and close mating surfaces deserve particular attention.
Anodic coating thickness is not the same as dimensional buildup. Because oxide forms partly below the original aluminum surface and partly above it, a stated coating thickness should not be applied as a full dimensional offset on every feature. The actual dimensional change depends on the anodizing process and feature geometry, so critical bores, threads, and fits should be planned and inspected in the finished condition.
Surface Finish and Appearance
Anodizing does not hide the underlying surface completely. Machining marks, blasting, brushing, polishing, and chemical pretreatment all influence the final appearance.
Once the anodized layer is removed, the underlying aluminum surface becomes visible again.
That can produce a noticeably different texture from the original anodized surface. A machined surface may look bright and directional, while chemically stripped aluminum may have a more matte or etched appearance.
This is one reason a stripped part does not necessarily look "like it did before anodizing."
If appearance matters, the drawing should define the required post-removal finish instead of simply specifying "anodizing removed."
Corrosion Resistance
Anodizing provides a controlled oxide layer that improves the aluminum surface's resistance to corrosion and environmental exposure.
Removing that layer exposes the aluminum substrate and changes the surface protection.
The part may still form a thin natural oxide film very quickly, but that natural oxide is not equivalent to a controlled anodic coating.
So if anodizing is removed from a functional area, consider what that area will experience afterward. A protected enclosure surface and an exposed outdoor contact area have very different requirements.
Electrical Conductivity
Aluminum is electrically conductive, but anodized aluminum generally has much lower surface conductivity because the anodic oxide layer is electrically insulating.
Standard and hardcoat anodizing generally reduce surface conductivity because the anodic oxide is electrically insulating. Conductive anodizing is a separate finishing route intended to retain controlled electrical contact and should not be treated as equivalent to either bare aluminum or conventional anodizing.
Removing anodizing from a defined contact area can therefore restore direct metal contact.
This is common around grounding points, electrical contacts, bonding surfaces, and some enclosure interfaces.
The contact requirement should still be specified clearly. Simply saying "remove anodizing for conductivity" does not define the required contact area, surface roughness, flatness, or allowable coating residue.
Re-Anodizing Considerations
A stripped part can sometimes be re-anodized, but removing the original coating does not guarantee that the part is ready for a new anodizing cycle.
After alkaline stripping, additional surface cleaning or de-smutting may be required before re-anodizing because alloying elements or residues can remain on the aluminum surface. Previous machining and finishing history can also affect the result.
If the part is going to be re-anodized, the aluminum substrate needs to be suitable for the new finishing process and the surface needs to be prepared consistently.
This is particularly important for cosmetic parts. Re-anodizing does not necessarily reproduce the exact appearance of the first anodizing cycle.
For more on how anodizing affects CNC parts, coating thickness, alloys, and dimensional planning, see our guide to how to anodize aluminum.
How to Choose an Anodizing Removal Method
Choose the removal method from the required finished condition, not from the removal process alone.
For new CNC production, a partially anodized requirement should be planned as part of the machining and finishing sequence. Depending on the geometry and required finish boundary, the uncoated area may be created by pre-anodizing masking or by a controlled post-anodizing machining or laser process.
The drawing should make those areas clear before production starts.
Do not rely on a note such as "mask where necessary" without showing where the masking or bare-metal zone actually belongs.
| Requirement | Common approach | Main consideration |
|---|---|---|
| Remove anodizing from most of the part | Chemical stripping | Control substrate attack and dimensional change |
| Remove a small accessible area | Mechanical removal | Surface texture and consistency |
| Remove a defined precision area | Secondary CNC machining | Requires dimensional control |
| Remove a small localized surface without contact | Laser-based removal | Process parameters and substrate protection |
| Need electrical contact | Localized machining or controlled removal | Define contact area on drawing |
| Need to refinish the whole part | Full stripping followed by surface preparation | Final surface condition matters |
How to Produce Partially Anodized Aluminum Parts
Keeping selected surfaces bare while anodizing the rest of the part is a form of selective anodizing. The uncoated areas are usually created through anodizing masking or controlled post-anodizing removal.
There are two main ways to produce a partially anodized aluminum part.
You can keep selected areas from being anodized in the first place, or you can anodize the entire part and remove the anodic layer afterward.
Both approaches can work. They are not interchangeable.
Masking Before Anodizing
Masking prevents the anodizing process from reaching selected surfaces.
This can be useful when a feature must remain electrically conductive, dimensionally unchanged, or free of anodic coating.
The important point is that masking has to be planned around the anodizing process. The shape, accessibility, electrical contact, and geometry of the masked area can affect how consistently the boundary is produced.
Small or complex areas can also be difficult to mask reliably.
For production parts, the drawing should define the intended uncoated region instead of assuming the finishing supplier will know which features are functionally important.
Removing the Anodized Layer After Full-Part Anodizing
The alternative is to anodize the complete part and then selectively remove the coating from specific areas.
This can be done through secondary machining or other controlled localized processes.
The advantage is that the main surfaces receive a continuous anodized finish. The exposed zones can then be created where required.
The disadvantage is that the removal operation can change the underlying surface. CNC machining, for example, removes both anodizing and some aluminum. A laser process can affect surface condition if the energy is not properly controlled.
The choice therefore depends on the geometry and the required boundary.
Masking vs. Post-Anodizing Removal
Masking can be useful when specific surfaces need to remain uncoated and the geometry allows the masking boundary to be controlled during anodizing. Post-anodizing removal may be considered when a defined bare area is easier to create after the main finish has been applied, particularly when the area also has a machining or dimensional requirement. The appropriate sequence depends on the part geometry, coating specification, tolerance, surface finish, and required boundary.
For a simple contact face, either method may be practical.
For a complex part with several precision areas, the manufacturing sequence should be reviewed before the anodizing callout is finalized.
The drawing should answer three questions:
- Which surfaces are anodized?
- Which surfaces must remain bare?
- Where exactly is the boundary between them?
That information removes much of the guesswork from production.
How Should Localized Anodizing Requirements Be Shown on a 2D Drawing?
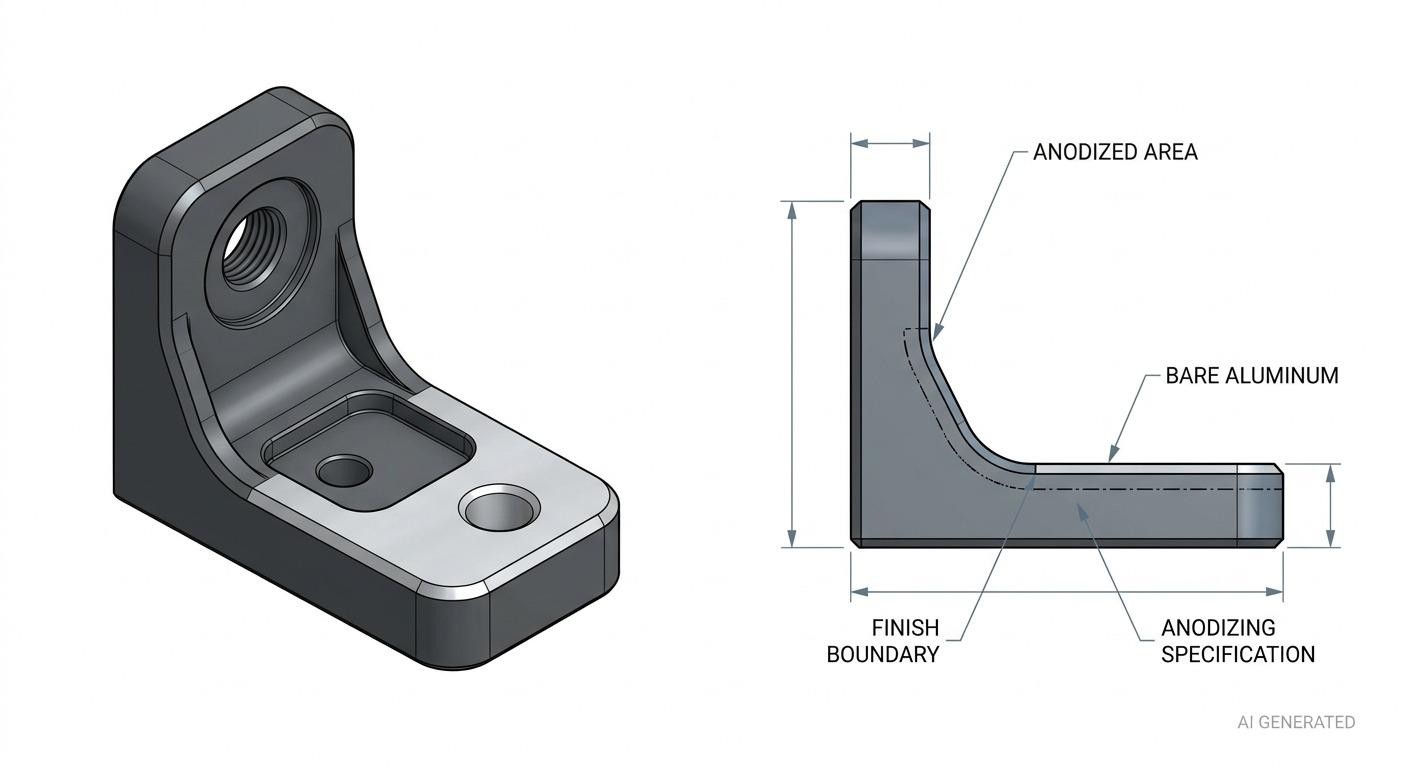
3D and 2D CNC-machined aluminum housing with machined features
A partial anodizing requirement should be treated like any other functional manufacturing requirement.
A supplier should not have to infer the boundary from a shaded CAD model or from a note such as "leave this area uncoated."
The 2D drawing should make the requirement measurable.
Identify the Areas That Must Remain Uncoated
Clearly identify every surface that needs to remain bare aluminum.
This can be done using a detailed drawing view, section view, surface callout, or other standard drawing convention appropriate to the part.
For complex geometry, a separate enlarged detail view is often clearer than trying to place the entire requirement on the main view.
Define Functional or Dimensional Requirements
If the uncoated area is needed for electrical contact, specify the contact surface and any relevant dimensional, flatness, roughness, or conductivity requirements.
If the area is a bearing seat or mating feature, define its finished dimensional requirement.
If it is simply cosmetic, say so.
The anodizing requirement and the functional requirement are related, but they are not the same thing.
Specify the Anodized and Uncoated Boundaries
The transition between anodized and uncoated aluminum needs a defined location.
For example, a drawing may identify a surface region that remains bare and dimension its boundary from known part features.
This is much more useful than telling the manufacturer to "remove anodizing around the hole."
The exact boundary can affect assembly, electrical contact, appearance, and inspection.
Specify the Anodizing Type and Finish
The drawing should also identify the anodizing process and required finish.
Depending on the application, this may include:
- Anodizing type
- Coating class or thickness requirement
- Color
- Surface appearance
- Sealing requirement
- Areas to remain uncoated
- Any critical dimensions affected by the finish
For production CNC parts, anodizing should be considered during design rather than treated as a final cosmetic operation.
JLCCNC's anodizing guidance similarly recommends defining coating type, class, target thickness, and areas that must remain untreated when dimensional or functional requirements matter.
Anodizing Removal FAQs
Can anodized aluminum be re-anodized after removal?
Yes, a stripped aluminum part can potentially be re-anodized, but the result depends on the alloy, surface condition, stripping process, and subsequent pretreatment. Removing the old coating does not guarantee that the new finish will look identical to the original.
Does anodizing removal restore the part to its original dimensions?
Not necessarily. Removing the anodic layer exposes the underlying aluminum, but the stripping process itself may also remove or etch some base metal. Mechanical or CNC removal can also change the geometry. On a precision part, measure the relevant features rather than assuming the original dimensions have been restored.
Is removing anodizing the same as removing natural oxidation from aluminum?
No. Natural oxidation is the very thin oxide film that forms on exposed aluminum. Anodizing intentionally creates a much thicker and more controlled anodic oxide layer through an electrochemical process.
The keyword "how to remove oxidation from aluminum" is therefore broader than "how to remove anodizing." The appropriate process depends on which oxide or surface condition is actually being removed.
Can anodizing be removed from only one area of an aluminum part?
Yes. Localized anodizing removal is possible using controlled machining, mechanical methods, or specialized laser-based processes. The right method depends on the size of the area, its dimensional requirements, accessibility, and the required surface finish.
For CNC production, a secondary machining operation is often easier to control when the exposed area has a precise geometry.
Can CNC machining remove anodizing without affecting critical dimensions?
CNC machining can remove anodizing from a defined area, but it does so by cutting away the anodic layer and a controlled amount of aluminum beneath it. The final dimension therefore has to be treated as a machining requirement, not assumed from the coating thickness.
Conclusion About Anodizing Removal
Removing anodizing is not simply a matter of making the aluminum look silver again.
The anodic layer is part of the engineered surface, so removing it changes the condition of the part. Chemical stripping can treat large areas efficiently, but it can also attack the aluminum substrate. Mechanical removal is accessible and straightforward, but it changes the surface. CNC machining gives strong dimensional control for defined regions, while laser-based methods can provide localized processing when the application and parameters are appropriate.
The most important decision is whether the entire part needs to be stripped or only a specific area needs to become bare aluminum.
For partially anodized CNC parts, define that requirement before production. Show the anodized and uncoated areas on the 2D drawing, identify the boundary, specify the anodizing type and finish, and call out any electrical, dimensional, mating, or cosmetic requirements.
That gives the manufacturer a process to follow instead of a finish to interpret.
For CNC-machined aluminum parts with anodizing, localized coating removal, or other surface-finishing requirements, send the CAD model and drawing with the finish requirements clearly identified.
CNC Machining Service
Professional manufacturing, fast turnaround, and quality assurance.
Popular Articles
• Surface Finish in Machining, Types, Charts & Testing
• Anodizing vs. Hard Anodizing: The Differences in Surface Treatment Techniques
• Anodized Aluminum Colors: Options, Limits, and Real-World Results
• Explanation of different material surface treatment technologies in CNC machining
• How to choose between Laser marking and UV printing?
Keep Learning
Surface Finish in Machining, Types, Charts & Testing
What is Surface Finish in Machining? At its core, surface finish in machining refers to the small-scale irregularities left on the surface of a part after machining. These irregularities are typically grouped into three categories: Roughness: The fine, closely spaced deviations caused by the cutting process itself. Roughness depends heavily on feed rate, tool sharpness, and cutting speed. Waviness: Larger, more widely spaced variations caused by machine tool vibration, deflection, or thermal distortio......
CNC Machining Surface Roughness: A Practical Guide
Why Surface Roughness Matters in CNC Machining When we talk about CNC machining, precision isn't just about hitting the right dimensions, it’s also about how the surface feels and performs. Surface roughness describes the fine irregularities left on a machined surface, and it directly impacts how a part behaves in the real world. So, what is surface roughness? In simple terms, it's the measure of tiny peaks and valleys created by the cutting process. While they might look smooth to the naked eye, thes......
Optimizing Manufacturing Efficiency: A Guide to Computerized Numerical Control (CNC) Machining Surface Finishes
CNC Surface Finishes: Types, Costs, and How to Choose Quick Answer: Choose an as-machined finish when cost and dimensional stability matter most. Use bead blasting or brushing for a uniform cosmetic appearance, anodizing for aluminum corrosion resistance, hard anodizing for wear, and laser marking or UV printing for identification. Confirm material, tolerance, color, masking, and end-use environment before quoting. A CNC-machined part comes off the machine functional but rarely finished — tool marks, ......
Anodizing vs. Hard Anodizing: The Differences in Surface Treatment Techniques
Quick Answer: Choose Type II anodizing when corrosion resistance, color, and cosmetic appearance are the main requirements. Choose Type III hard anodizing when the part needs greater wear resistance and the coating thickness can be accommodated in the fit and tolerance plan. Confirm alloy, coating thickness, color, sealing, and critical dimensions before release. An aluminum bracket for an outdoor enclosure and a hydraulic cylinder rod both might get anodized — but specifying the same process for both......
How to Remove Anodizing from Aluminum Parts
Key Takeaways Chemical stripping is commonly used when anodizing needs to be removed from most or all of an aluminum part, but the process can also attack the underlying aluminum if it is not controlled. Mechanical removal works well for accessible areas but can change the surface texture and remove more base metal than intended. CNC machining gives better control when a defined anodized area needs to be removed from a precision part. Laser-based removal can be useful for controlled localized treatmen......
Anodizing Thickness: How Much Does It Add?
Anodizing Thickness and Dimensional Change at a Glance Feature Approximate dimensional effect One coated external surface +0.5 × coating thickness Outside diameter across two coated surfaces +1 × coating thickness Bore diameter with two coated walls −1 × coating thickness 60° thread pitch diameter Changes by about 4 × surface-growth amount, or about 2 × coating thickness under the 0.5× growth assumption Dimensional estimates below use the 0.5 × coating-thickness surface-growth relationship given in MI......