Sheet Metal Assembly: How Fabricated Parts Come Together
8 min
- Sheet Metal Assembly: How Fabricated Parts Come Together
- What "Sheet Metal Assembly" Covers
- Joining Methods Used in Sheet Metal Assembly
- Assembly Sequence Matters More Than It Looks
- Tolerance Stack-Up in Assembly
- Design for Assembly (DFA) Considerations
- Where Sheet Metal Assembly Shows Up
- FAQ
Sheet Metal Assembly: How Fabricated Parts Come Together
Cutting and bending gets a lot of attention because that's where a flat sheet visibly turns into a 3D part. But a single bracket by itself rarely finishes the job — most real sheet metal products are assemblies, multiple formed pieces joined into one working unit, and that assembly step is where a lot of designs quietly succeed or fail. A part that measured perfectly on its own can still not fit once it's supposed to mate with three other pieces, a PCB, and a set of standoffs.
This guide covers what actually happens at the assembly stage of sheet metal fabrication — the joining methods involved, the design considerations that make assembly go smoothly (or don't), and where things tend to go wrong on a first custom build.
Need Fully Assembled Sheet Metal Parts?
If you have a multi-part enclosure or bracket assembly ready for production, JLCCNC can handle the entire workflow—from laser cutting and bending to welding, PEM insertion, and final assembly.

Precision Sheet Metal Fabrication
Professional manufacturing, fast turnaround, and quality assurance.
What "Sheet Metal Assembly" Covers
Assembly is the stage where individually fabricated sheet metal components — panels, brackets, covers, chassis pieces — get joined into a finished structure, along with any hardware (fasteners, standoffs, PEM inserts) and, in many cases, integration with non-sheet-metal components like PCBs, wiring harnesses, or machined parts. It sits downstream of cutting and bending in the fabrication sequence, and it's where individual part tolerances stop mattering in isolation and start mattering as they stack up against each other.
Joining Methods Used in Sheet Metal Assembly
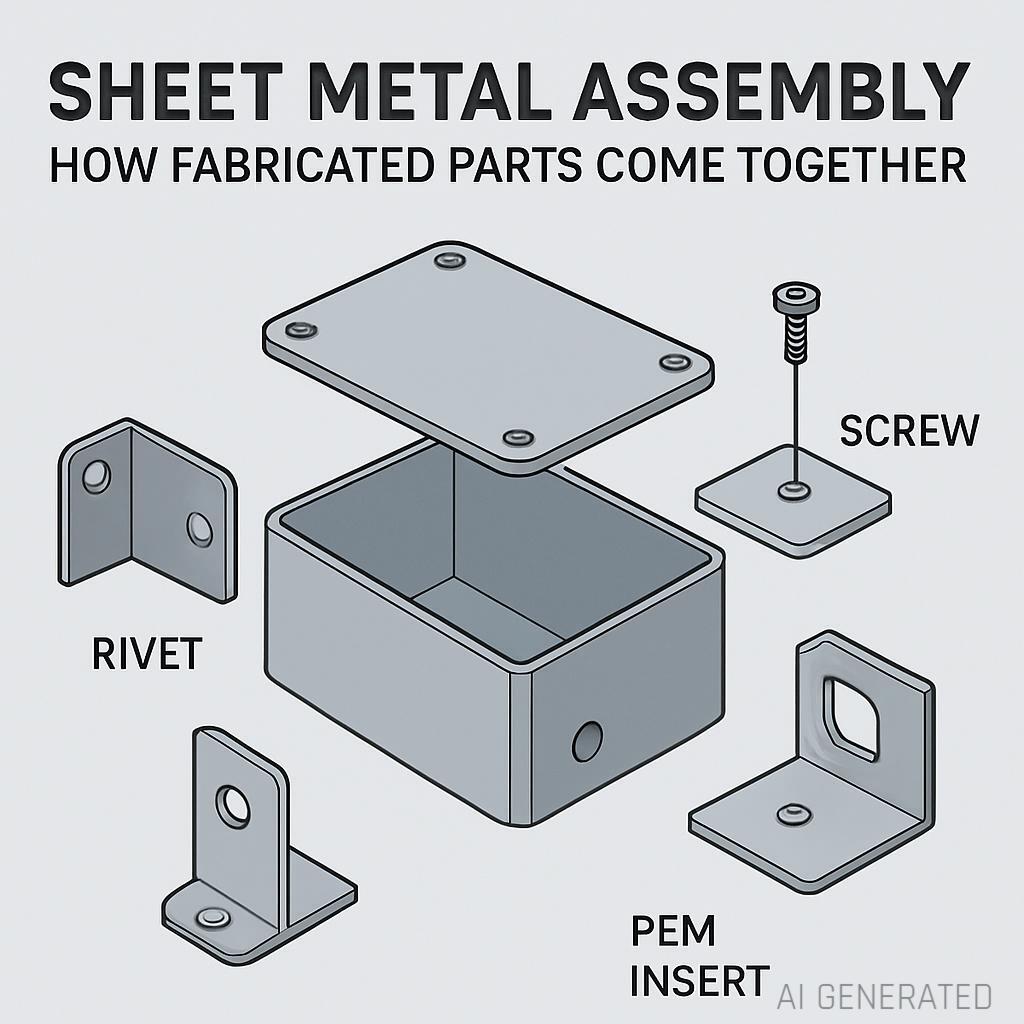
Welding produces the strongest, most permanent joints, fusing pieces at the molecular level. It's the right call for structural assemblies that need to hold up under load or vibration, For thin enclosures, Spot Welding is incredibly common because it is fast and minimizes heat distortion.but it introduces heat that can warp thin material and typically requires post-weld cleanup (grinding, blending) if the joint needs to look clean rather than just be strong.
Riveting joins pieces mechanically without heat, which avoids warping and works well across dissimilar metals that wouldn't weld cleanly. It's faster to set up for repetitive joints and easier to predict dimensionally than welding, at the cost of somewhat lower joint strength for a given material thickness.
Fastening — screws, bolts, and threaded inserts — is what makes an assembly serviceable rather than permanent. Anything that needs to come apart for maintenance, upgrades, or field service gets fastened rather than welded or riveted, even though this generally weakens the structure slightly and adds parts count.
PEM inserts and standoffs get pressed into sheet metal to create durable threaded mounting points in material too thin to hold a reliable thread on its own — a detail that shows up constantly in electronics enclosures, where PCBs and other internal components need secure, reusable mounting points in what's often only 1–2mm of material.
Most real assemblies combine more than one of these. A chassis might be welded at the structural seams for rigidity, then have fastened access panels for serviceability, with PEM standoffs pressed in for internal component mounting.
Assembly Sequence Matters More Than It Looks
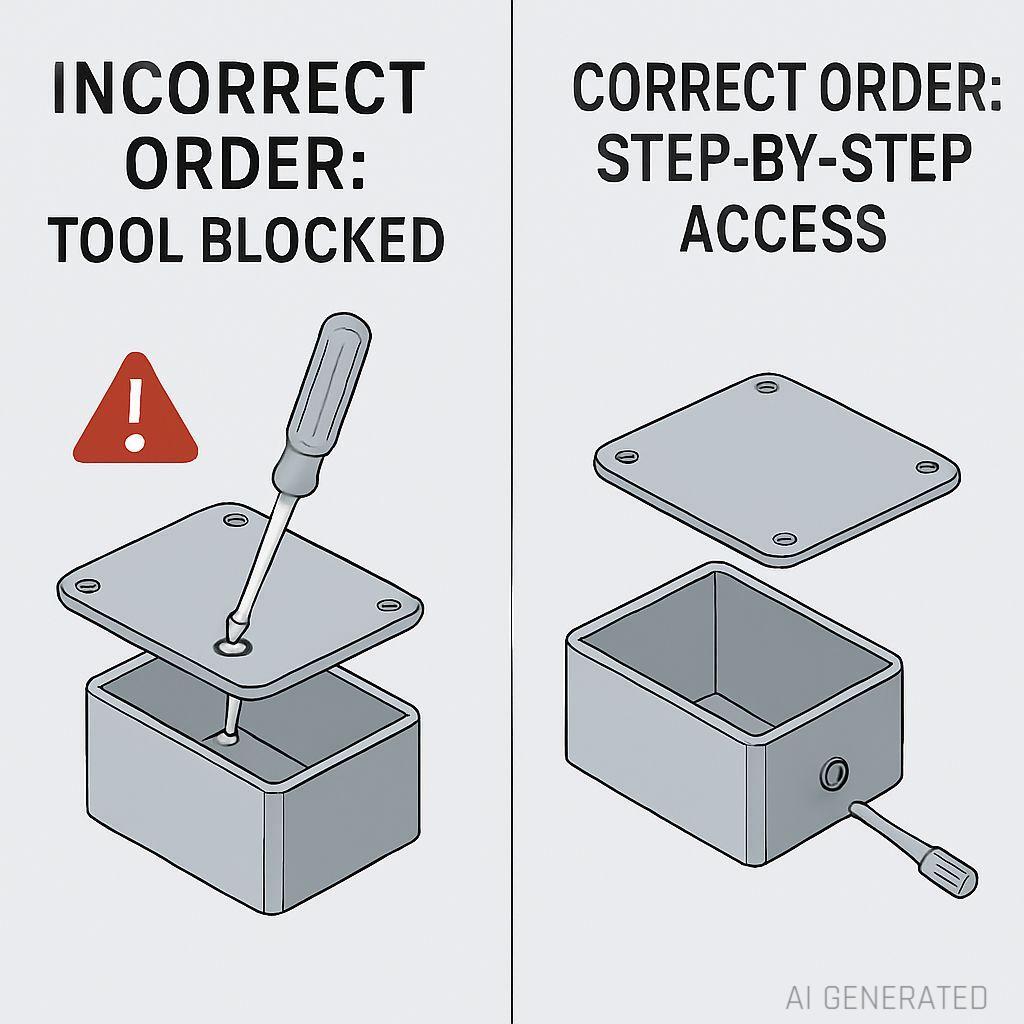
Here's a mistake that shows up constantly on first-time designs: a part that looks perfectly buildable in an exploded CAD view turns out to be physically unassemblable in the real sequence, because a later step blocks access to an earlier one. A fastener that needs to go in from the inside of an enclosure, after the enclosure is already closed up by the piece that was supposed to go on last — that's not a hypothetical, it's one of the most common review catches on a design that hasn't been built by hand yet. Working through the actual build order, step by step, before committing to a design is worth doing even when it feels like an unnecessary extra pass.
Tolerance Stack-Up in Assembly
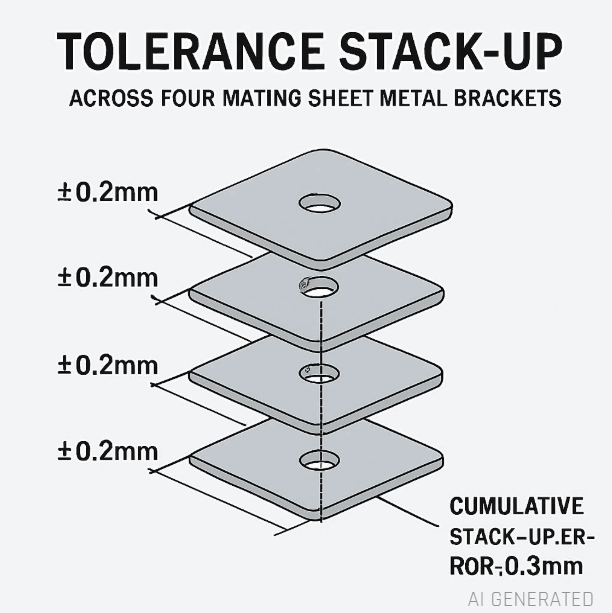
Individual sheet metal parts hold their own tolerances reasonably well, but when several parts join together, their individual tolerances add up — a phenomenon called tolerance stack-up. A part with a ±0.2mm tolerance on a mounting hole isn't a problem alone; four parts each with their own ±0.2mm tolerances stacking in the same direction across an assembly can add up to nearly a millimeter of misalignment by the time everything's bolted together. This is exactly the kind of problem that doesn't show up until the actual assembly stage, since it's invisible when reviewing parts individually. Tightening every individual tolerance to compensate is usually the wrong fix — it drives up cost across every part. A better approach is usually to identify which specific dimensions actually matter for fit in the finished assembly and hold those tighter, while leaving non-critical dimensions at standard tolerance.
Design for Assembly (DFA) Considerations
A few practical habits reduce assembly headaches before they happen. Self-locating features — a tab-and-slot arrangement, or a pilot hole slightly larger than its fastener — help parts find their correct position during assembly without relying purely on operator care, and they speed up repeatable production assembly meaningfully. Standardizing fastener types and sizes across an assembly, rather than mixing several different screw sizes for no functional reason, cuts down on both build-time errors and the number of tools needed on the assembly line. And leaving genuine clearance for tools — enough room for a screwdriver or wrench to actually reach a fastener at its intended angle — sounds obvious until a tightly packed enclosure design proves it wasn't obvious enough during the CAD phase.
Where Sheet Metal Assembly Shows Up
Electronics enclosures are one of the most common contexts — a chassis, a lid, internal mounting brackets, and standoffs all need to come together around a PCB and other components with enough precision that everything actually fits and the enclosure closes cleanly. Industrial equipment housings and control cabinets follow similar logic at a larger scale, often adding weld seams for structural rigidity alongside fastened access panels. HVAC ductwork assembly is its own specialized case, relying on flanged, riveted, or clip-together joints across long production runs where consistent joint quality across every unit matters as much as any single joint's strength.
If you're earlier in the process and trying to decide how a design should even be structured — as a single formed piece versus a multi-piece assembly — our broader guide on what sheet metal fabrication is covers the core processes that assembly builds on, and our sheet metal enclosure design guide goes deeper into the specific challenges of enclosure assemblies.
Streamline Your Sheet Metal Assembly Production
At JLCCNC, we don't just cut and bend flat patterns. Welding, riveting, PEM hardware insertion, and mechanical fastening are all core parts of our sheet metal fabrication service. This means your multi-piece assembly can be quoted, built, and shipped as one complete, ready-to-use unit—saving you the headache of managing multiple vendors and minimizing tolerance risks.
Ready to see your assembly come together? Upload your CAD files today to get an instant quote on your complete sheet metal assembly project.
FAQ
What's the difference between welding and riveting for sheet metal assembly?
Welding creates a permanent, fused joint with the highest strength, but introduces heat that can warp thin material. Riveting joins mechanically without heat, making it a better fit for thin material, dissimilar metals, or assemblies where warping is a concern, at somewhat lower joint strength than welding.
How do I account for tolerance stack-up in a multi-part assembly?
Identify which specific dimensions actually determine fit in the finished assembly and hold those to tighter tolerances, rather than tightening every dimension on every part uniformly, which adds cost without meaningfully improving the assembly's actual fit.
Can sheet metal parts be assembled with both welding and fasteners in the same unit?
Yes, and it's common — structural seams are often welded for rigidity while access panels or serviceable sections use fasteners, combining the strength of welding with the maintainability of a removable panel.
What are PEM inserts used for in sheet metal assembly?
PEM inserts (also called press-fit or self-clinching fasteners) are pressed into sheet metal to create durable, reusable threaded mounting points in material too thin to hold a reliable thread directly — commonly used for mounting PCBs, panels, or other components that need to be removable.
Popular Articles
• 9 Sheet Metal Cutting Problems and Solutions
• Hole cutting in sheet metal: techniques, tolerances and applications
• Introduction to Sheet Metal Processing: Techniques and Tools for Precision
• Bending and Forming Technology in Sheet Metal Processing
• Laser cutting technology in sheet metal processing
Keep Learning
Galvanized Sheet Metal: Grades, Specs & When to Use It
Galvanized Sheet Metal: Grades, Specs & When to Use It A design engineer specs "galvanized sheet metal" on a drawing and sends it out for quotes. Three shops come back with three different prices, and one of them asks a follow-up question the others didn't: which gauge, which coating class, hot-dip or electro-galvanized? That question is the difference between a part that survives outdoors for fifteen years and one that starts showing rust spots after eighteen months — and it's the kind of detail that......
Custom Sheet Metal Fabrication: How the Process Works From Design to Delivery
Custom Sheet Metal Fabrication: How the Process Works From Design to Delivery A stock enclosure almost fits. The mounting holes are close but not quite right, the depth is half an inch too shallow, and the vendor's next size up is twice the volume you actually need. This is the point where most people start looking into custom sheet metal fabrication — not because they set out to design a part from scratch, but because nothing off the shelf actually solves the problem. Custom fabrication sounds like i......
Sheet Metal Assembly: How Fabricated Parts Come Together
Sheet Metal Assembly: How Fabricated Parts Come Together Cutting and bending gets a lot of attention because that's where a flat sheet visibly turns into a 3D part. But a single bracket by itself rarely finishes the job — most real sheet metal products are assemblies, multiple formed pieces joined into one working unit, and that assembly step is where a lot of designs quietly succeed or fail. A part that measured perfectly on its own can still not fit once it's supposed to mate with three other pieces......
Sheet Metal Bender: Types, Specs & How to Choose the Right Machine
Sheet Metal Bender: Types, Specs & How to Choose the Right Machine Every sheet metal bracket, enclosure, and panel eventually passes through a bender of some kind — that's the machine, not the process. Our guide on sheet metal bending covers how bending actually deforms metal — springback, minimum radius, bend allowance, and the core press brake and CNC press brake setups most shops run. This one goes further into the equipment side specifically: the less common bender types beyond the standard press ......
What Is Galvanized Metal? Process, Types & How It Works
What Is Galvanized Metal? Process, Types & How It Works Leave a piece of bare steel outside for a season and you'll see exactly why galvanizing exists. Rust doesn't wait for dramatic weather — a little humidity and a few weeks is enough to start eating into an unprotected surface. Galvanized metal solves that problem by giving steel a sacrificial layer of zinc that corrodes in its place, and it's done this job well enough that it's become the default choice for anything from highway guardrails to HVAC......
What Is Sheet Metal Fabrication? The Complete Guide
What Is Sheet Metal Fabrication? The Complete Guide Somewhere between a CAD file and a working enclosure sitting on your bench, a flat piece of metal gets cut, bent, joined, and finished into something that actually does a job. That's sheet metal fabrication — and if you've never ordered a part before, the term can feel bigger than it needs to be. Ask five people what "sheet metal fabrication" covers and you'll get five different answers: some think laser cutting, some think welding, some just picture......